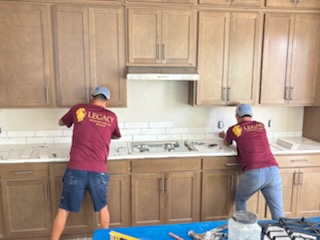
Welcome to Legacy Interior Services, your trusted experts for home interior upgrades in North Florida. Whether you’re refreshing a cozy Jacksonville kitchen or transforming a space in Tallahassee, installing a kitchen backsplash is a fantastic way to add style, protect your walls, and boost your home’s value. Inspired by popular home renovation shows like This Old House—which showcases timeless techniques for durable installations—and Fixer Upper, where creative designs turn ordinary kitchens into stunning focal points—we’re here to guide you through the process. At Legacy Interior Services, we bring that same professional touch to every project, and we offer free estimates to get you started without any commitment.
North Florida’s humid subtropical climate, with its high moisture levels and occasional heavy rains, makes it essential to choose materials and methods that resist mold and water damage. We’ll focus on practical, weather-appropriate tips throughout this guide. If DIY isn’t your style, our team of experienced installers can handle the job efficiently and flawlessly—just reach out for your free estimate today!
Why Install a Kitchen Backsplash?
A backsplash not only shields your walls from splatters, grease, and moisture but also serves as a design statement. In North Florida homes, where kitchens often blend indoor comfort with outdoor living vibes, options like ceramic tiles, glass mosaics, or natural stone can evoke coastal charm or rustic elegance. As seen on This Old House, proper installation ensures longevity, while Fixer Upper-style creativity can incorporate shiplap accents or bold patterns for that personalized touch.
Step-by-Step Process for Installing a Kitchen Backsplash
Follow these detailed steps for a successful installation. Always prioritize safety by wearing protective gear like gloves and eye protection. If you’re unsure about any part, Legacy Interior Services offers free estimates and professional consultations to ensure your project is done right.
Step 1: Planning and Material Selection
- Assess your kitchen layout: Measure the area behind your countertops, sink, and stove. In North Florida’s humid environment, opt for moisture-resistant materials like porcelain or glazed ceramic tiles to prevent warping or mildew.
- Choose your style: Draw inspiration from This Old House episodes featuring classic subway tiles or Fixer Upper’s farmhouse chic with peel-and-stick options for easier application.
- Gather supplies: You’ll need tiles, thin-set mortar (or mastic adhesive for simpler jobs), grout, spacers, a notched trowel, tile cutter, level, and sealant. Budget for extras to account for cuts and breaks.
Step 2: Prepare the Workspace
- Clear the area: Remove appliances, outlet covers, and any existing backsplash. Turn off power to outlets for safety.
- Clean and repair the wall: Wipe down with a degreaser, patch holes with spackle, and sand smooth. In North Florida’s muggy conditions, ensure the wall is completely dry—use a dehumidifier if needed to avoid adhesion issues.
- Apply a primer if working on porous surfaces like drywall, as recommended in This Old House tutorials for better bonding.
Step 3: Layout and Dry Fit
- Mark guidelines: Use a level to draw horizontal and vertical lines for alignment. Start from the center or a focal point like the stove.
- Dry fit tiles: Arrange them on the counter to visualize the pattern. Adjust for outlets and edges, cutting tiles as needed with a wet saw for precision, echoing the meticulous planning on Fixer Upper.
Step 4: Apply Adhesive and Install Tiles
- Spread mortar or adhesive: Using a notched trowel, apply a thin layer to the wall in small sections to prevent drying out—crucial in North Florida’s warm temperatures.
- Place tiles: Press them firmly into place with spacers for even gaps. Work from the bottom up to avoid slippage.
- Let set: Allow 24 hours for drying, keeping the area ventilated to combat humidity.
Step 5: Grout and Seal
- Mix and apply grout: Remove spacers and spread grout diagonally with a float, wiping excess with a damp sponge. Choose unsanded grout for narrow joints or sanded for wider ones.
- Clean up: After 15-20 minutes, buff haze with a cheesecloth. In humid North Florida, use a mold-resistant grout and apply a sealant 72 hours later for extra protection against moisture.
- Final touches: Reinstall outlets and appliances, sealing edges with caulk for a waterproof finish, just like the pros on This Old House.
Step 6: Cleanup and Enjoy
- Dispose of debris responsibly and admire your new backsplash! It should last for years with minimal maintenance—simply wipe down regularly.
Common Pitfalls to Avoid in North Florida
- Humidity traps: Always use ventilated fans during installation to speed drying.
- Material mismatches: Avoid non-porous options like untreated natural stone, which can absorb moisture and stain easily in our climate.
- Rushing the process: As emphasized on Fixer Upper, patience yields professional results.
Ready to elevate your kitchen? At Legacy Interior Services, we specialize in custom backsplash installations tailored to North Florida homes. Contact us today for a free estimate—no obligation, just expert advice inspired by the best in home renovation. Let’s make your space shine!